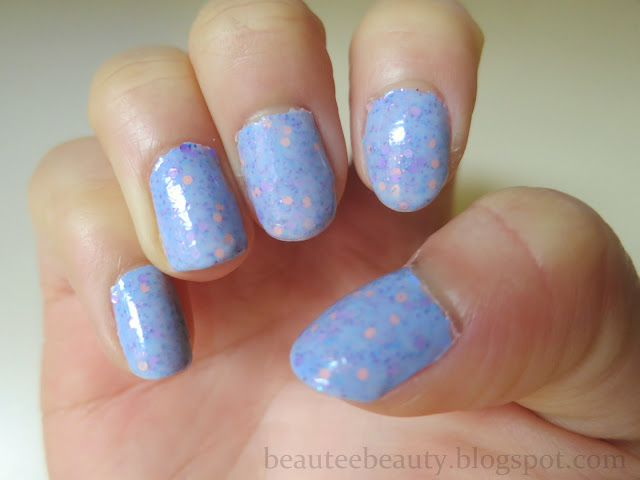
I've always wanted to try making 'jelly sandwich' nails but never really got round to doing it until some time last week. My first attempt failed because I did not realise what I was doing and coated my glitter with a creme polish. My second attempt came out pretty okay (I think they look somewhat like a 'jelly sandwich') and this is what I came up with.
I find it rather difficult to find jelly nail polishes. Jelly nail polishes are polishes that apply rather sheer and translucent on the nails, and the colour is normally buildable. Jelly polishes also provide a sheer, glossy finish. Nails painted with a combination of glitter and sheer polish produces the 'jelly sandwich' effect (I hope I described it correctly). I bought Barry M's Nude nail polish thinking I wanted to paint some nude nails, but the texture turned out to be too sheer and I would have needed at least 3-5 coats to get a opaque finish. I then thought of trying it out as part of a 'jelly sandwich' mani and it turned out to do well, albeit having a slight milky effect to the overall look!
What you need:
- A base colour polish (optional)
- A glitter polish
- A sheer polish
- A base coat and top coat
What to do:
1. After applying a layer of base coat and after it's dried, apply a layer or two of the sheer nail polish. Alternatively, you can add one to two coats of a colour polish like I did with my nails.
2. Then, apply one or two coats of a glitter polish. I think chunky glitter would work better with this look as it is more likely to stand out. Of course, I'm sure flat glitter will produce a subtle yet beautiful effect. I've yet to try that out though!
3. When the glitter has dried, apply another layer of the sheer polish. Since I used a sheer nude polish, my nails had a milky effect.
4. After that is done, apply your top coat and you are done!
Here's some swatches of my nails:-
 |
| A HUGE closeup of my thumb so you can see the glitter up close! |
I'm quite pleased with the combination I created. I like how the bigger pink and light purple glitter particles stand out against the cornflower blue of my base polish. There's also tiny dark purple, light purple and turquoise glitter pieces which just adds a beautiful speckled effect to the whole look which I'm loving! Barry M's Nude nail polish also helped create the milky-looking effect on my nails Overall, the nails look girly and soft as the glitter is not screaming for attention on the nails. The subtle hint of glitter also adds a soft, muted feel to it. It looks like a milky speckled Easter egg! I'm so pleased. Hee! =D
Here's the polishes I used to achieve this look:-
Left to Right:-
- The Face Shop Face It PP409, Topshop Celestial Blue, Barry M Nude, Miss Sporty Nail Expert Manicure Silk Base & Topcost (as base coat) and MUA Clear Top Coat.
So that's all! I hope you enjoyed reading this, and I hope you found it helpful. I know I won't be running about going crazy looking specifically for jelly polishes now!
Have you tried doing a 'jelly sandwich' mani? Do you like this type of nail art? =D
xx Amanda


OOO, that's a great idea! ^.^ How is removing the manicure though? I kinda suck at getting glitter polish off me nails.
ReplyDeleteHi dear thanks! =D removing it is still a nightmare though, as usual the glitter is a pain to remove. Am still finding ways to remove it besides soaking my nail in nail polish remover!
Deletenice blog hun! I like your nails :)
ReplyDeletewould you like to follow each other on gfc? xo
catherinebelle.blogspot.com
Thank you! =D I've followed! =)
DeleteSo cute, it would be great for Easter!
ReplyDeletehttp://heydahye.blogspot.com/
I think so too! =D
DeleteI love that glitter both in the bottle and in that jelly manicure.. do want. *drool* Fab!
ReplyDeleteLizzums x
http://benebelle.com
The glitter is absolutely gorgeous. I've already purchased a backup just in case. Haha!
Deletesuch an adorable nail. I just might try this :D
ReplyDeleteThank you! Would love to pictures of it on your blog if you do try it out. =D
DeleteGreat blog ! Want to try this out now :)
ReplyDeleteFollow me ? I always follow back :)
http://beautybysania.blogspot.com
Thank you! I've followed - hope you follow me back too. =D
Deletepretty colour ! I just followed you, hope you visit back. Have a wonderful week dear :)
ReplyDeleteIsabel
http://foreverunderstated.blogspot.se/
Thank you! I've visited your blog - it's great! Love your outfits. =D
DeleteThe colours look so playful and cute. Another lovely beauty blog :D
ReplyDeleteThanks for stopping by blog, do check back more often :)
Great post! :) I love this colour! :)
ReplyDeleteCheck out my recent post
www.lisa-cequejaime.blogspot.co.uk
xx